
本文主要针对使用Astro博客程序和Fuwari主题的用户,其它博客程序、主题不一定适用,不过其它静态博客程序的博客也可以作为参考。
需求:使用Umami统计网站访问量数据,并添加API接口实现Fuwari显示每个页面的访问量。
效果就是本站首页的文章卡片下方的访问量显示:

下面的代码是使用我魔改过的Astro Fuwari博客源码进行演示的,不过原版的Astro Fuwari配置起来也大差不差,不过还是推荐使用我魔改过的Astro Fuwari博客源码进行搭建。
加载中...
环境
- 服务器 Linux CentOS 9 x86_64
- 面板 1panel v2.0.0
- 容器 Docker
- 容器镜像 1panel应用商店 umami v3.0.0
- 网站环境 OpenResty(Nginx) + PHP v8.4.13 + PostgreSQL v18.0 alpine
- 博客程序 Astro + Fuwari
步骤
- 安装好1panel面板和相应的环境后,在1panel的应用商店中安装umami
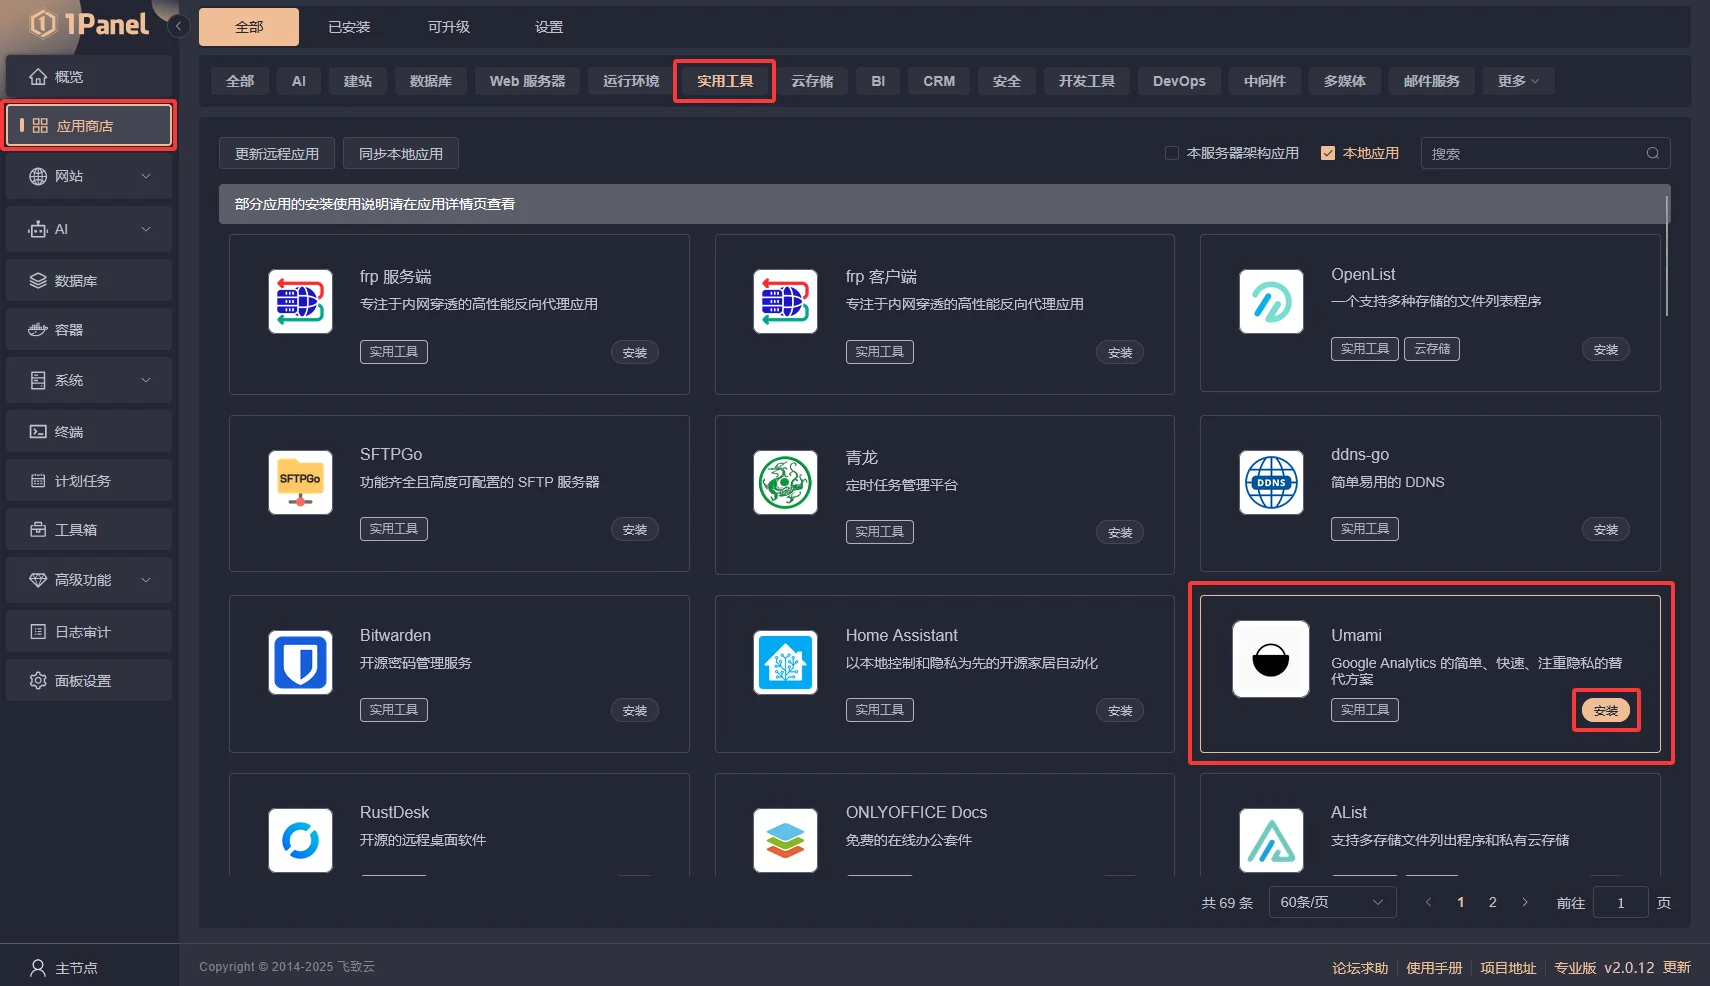
 注意:
注意:
外网访问可以不勾选,因为后面我们使用网站反向代理使用域名进行访问。
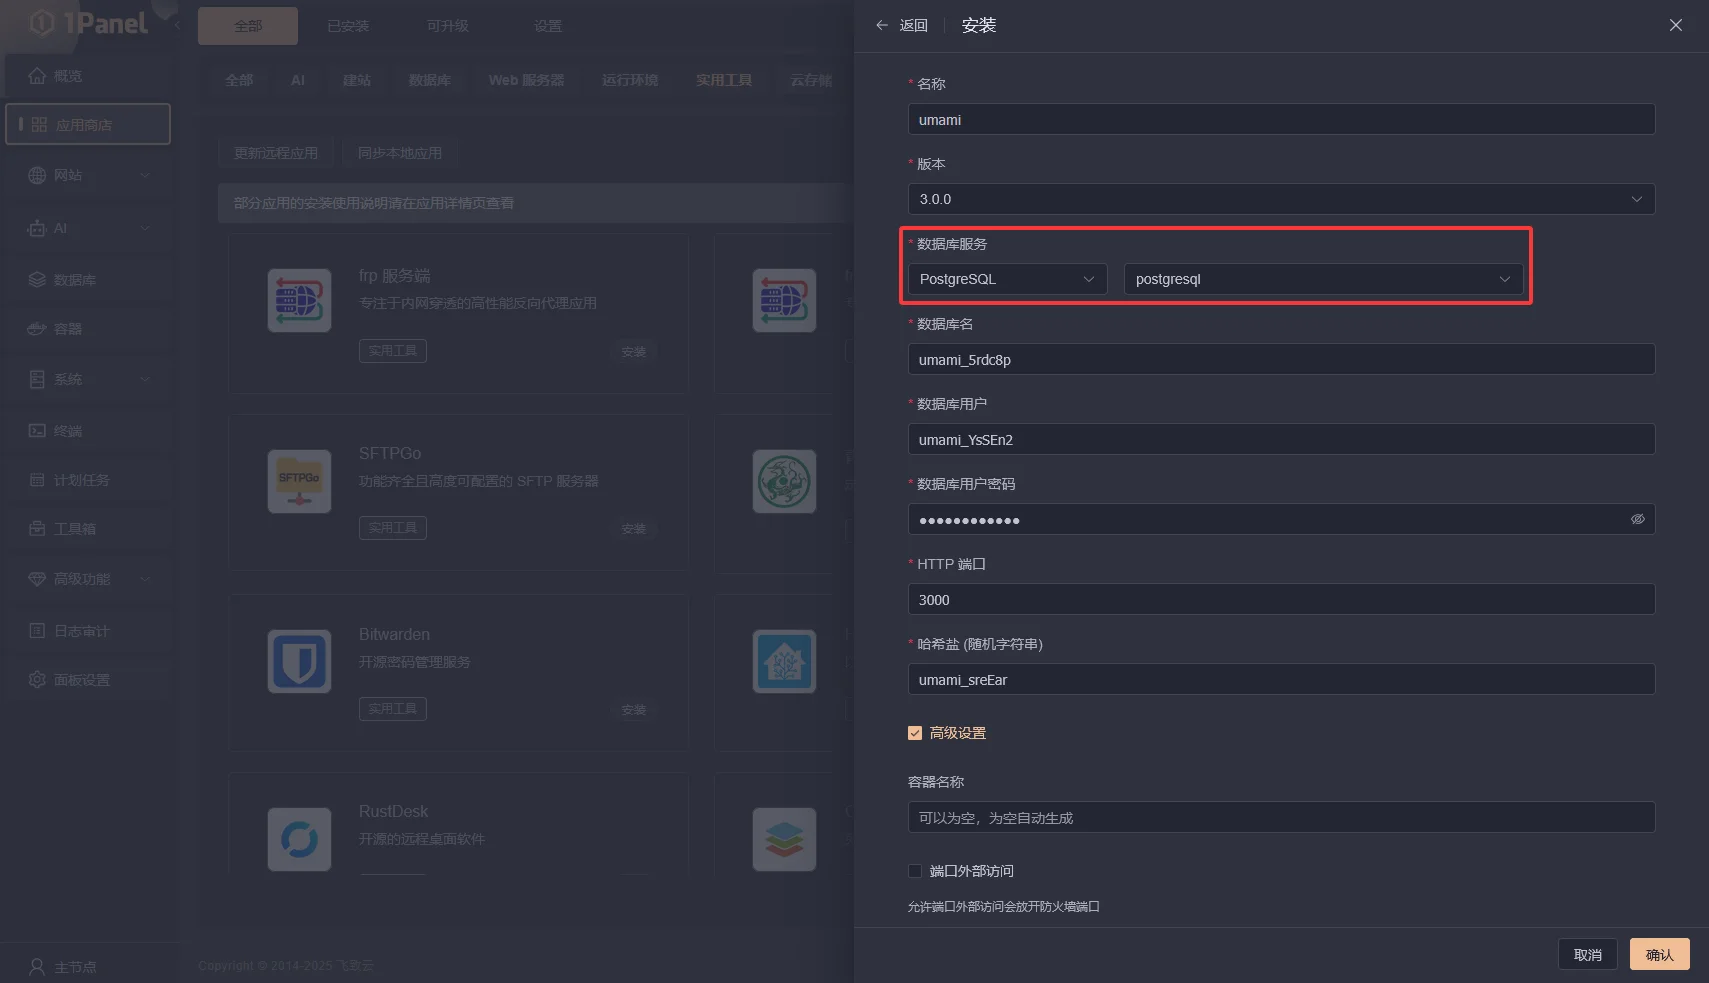
数据库选择 PostgreSQL ,如果没安装PostgreSQL,请先在1panel面板中的应用商店安装PostgreSQL后再安装umami。
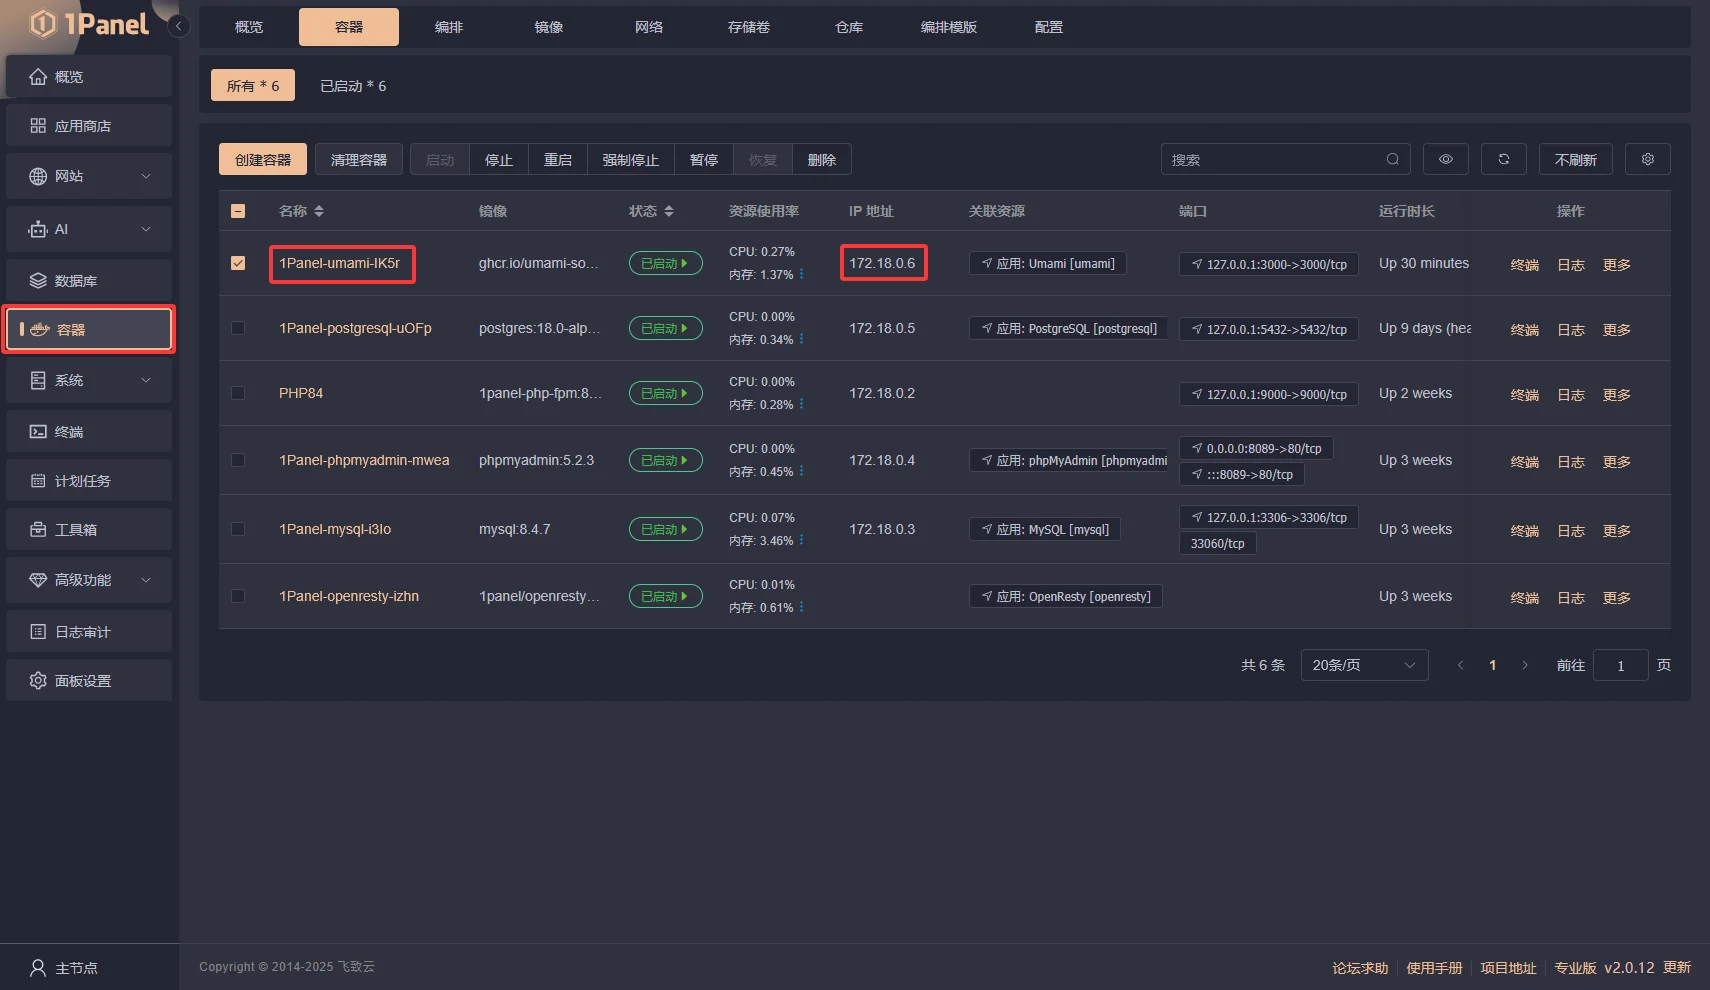
安装完成后在“容器”可以看到安装好的umami容器,这里需要把umami容器的“IP地址”记录下来,后面要用到。
注意: 你的容器名称可能会和我的有所不同,不过不影响后续进行。
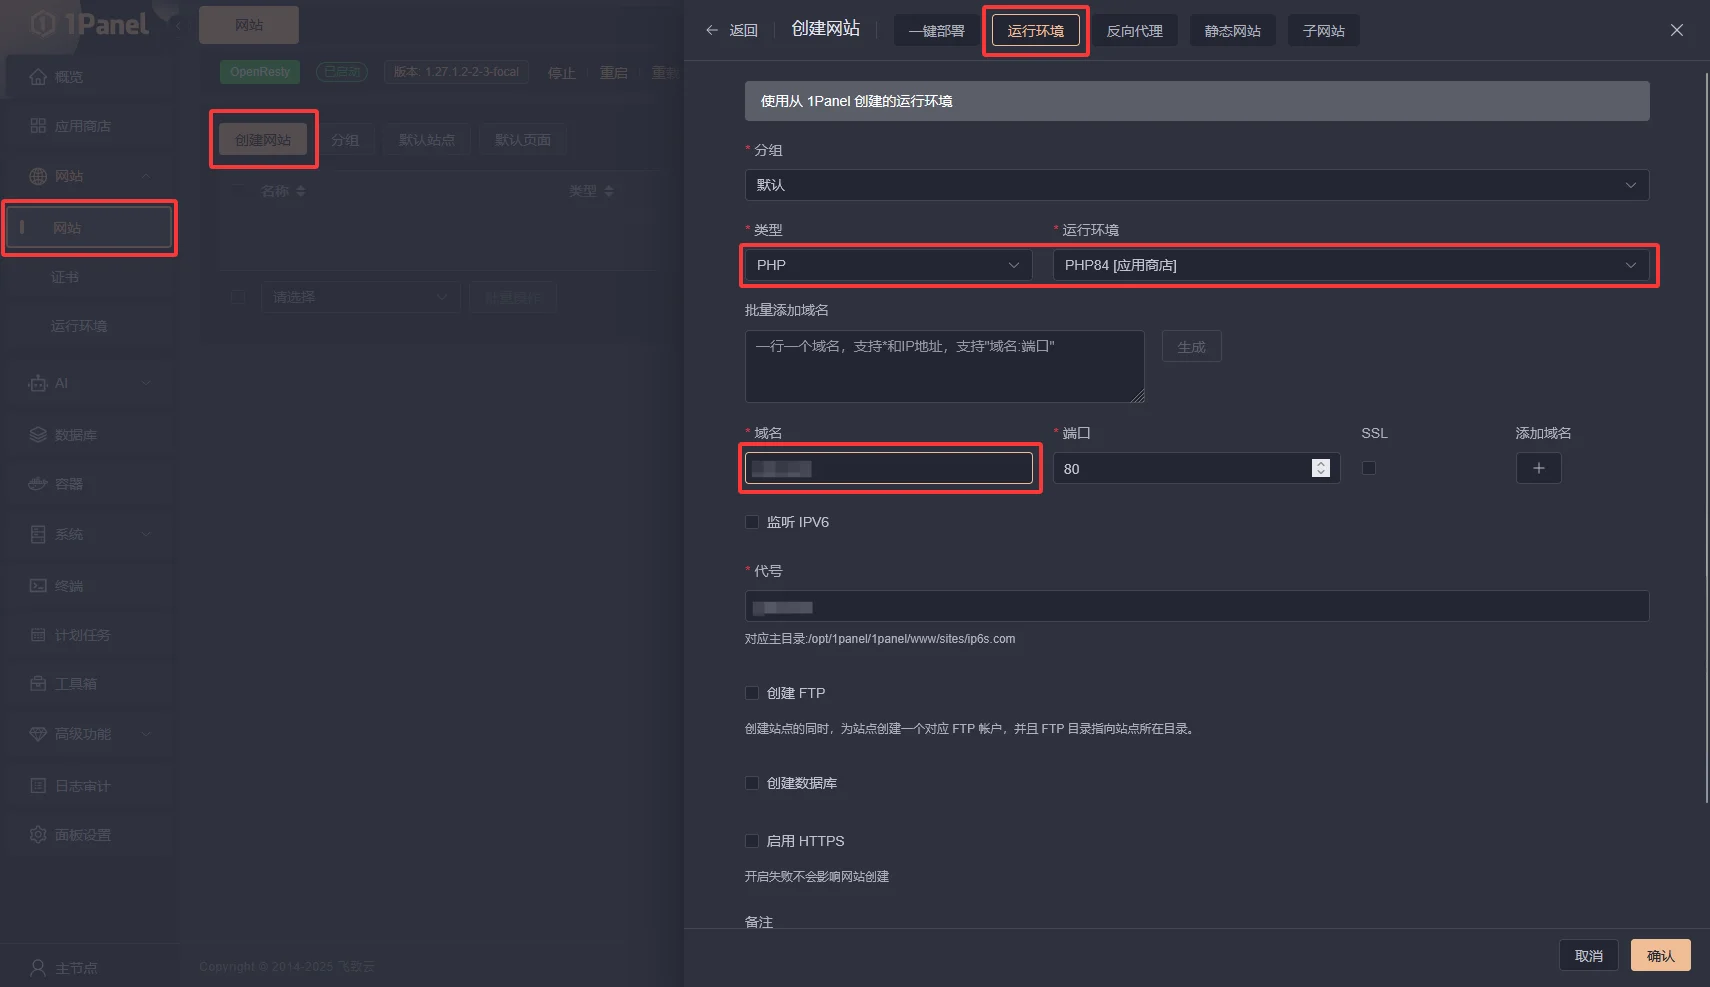
- 创建网站,配置反向代理
 注意:
注意:
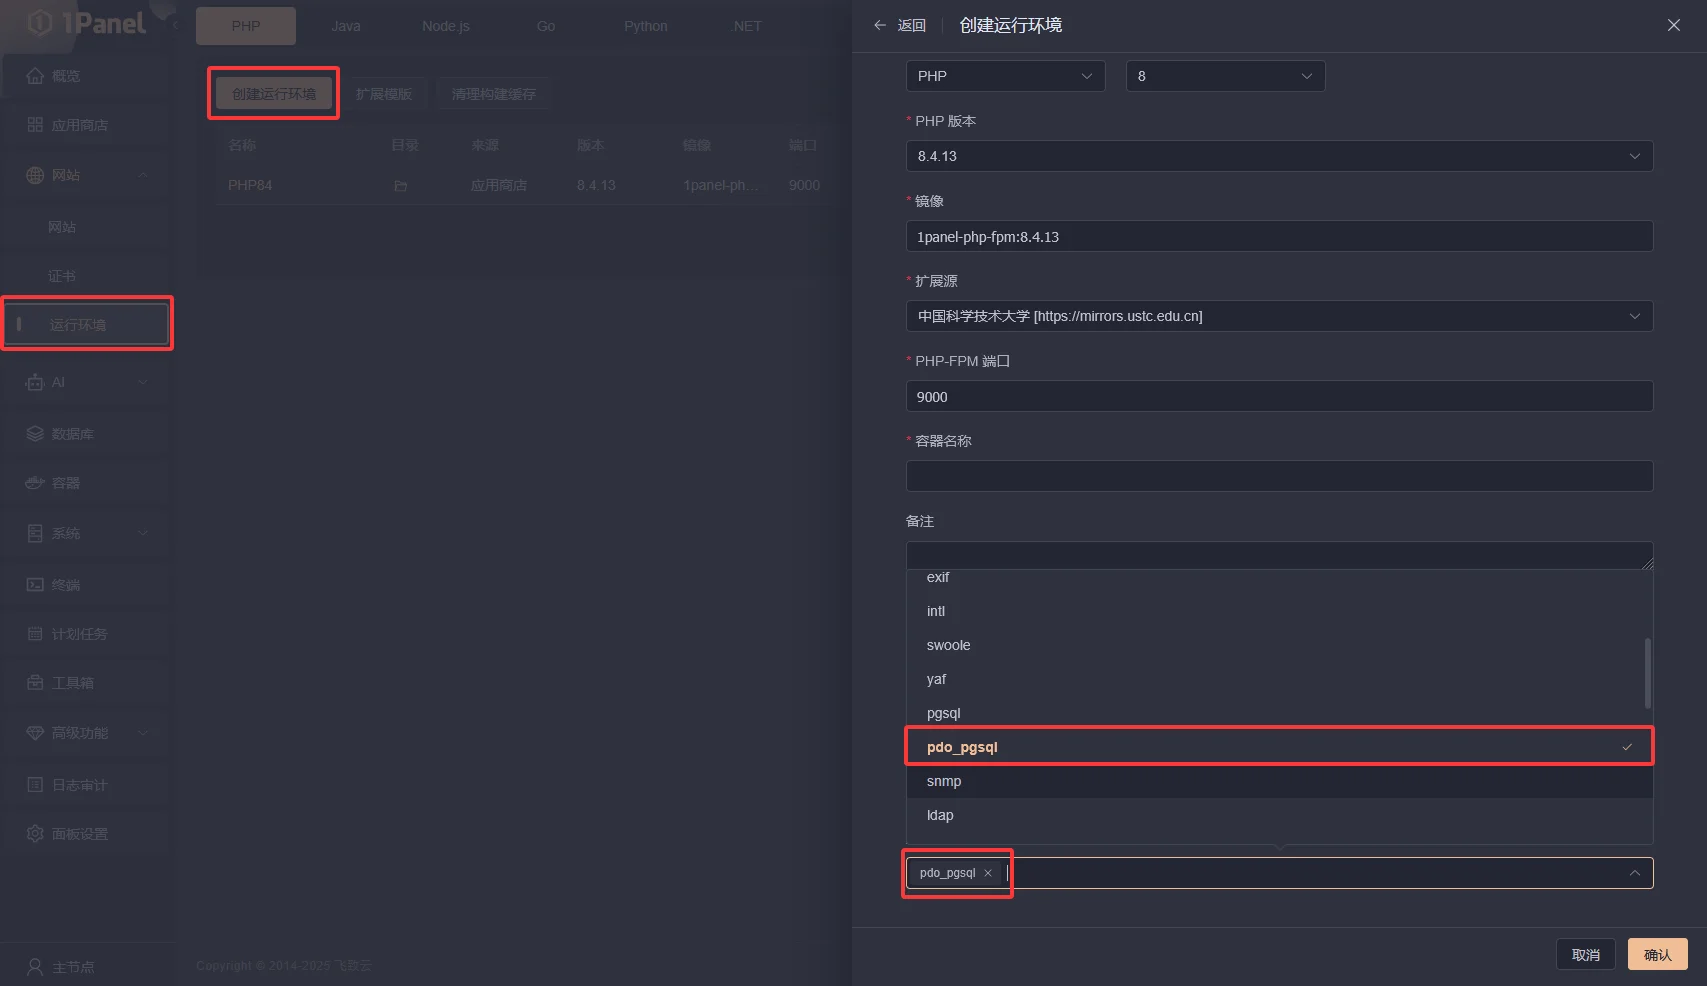
创建网站时选择“运行环境” - “PHP”,如果没安装PHP,请先在1panel面板中的运行环境安装PHP后再创建网站。
安装PHP时必须要安装 “pdo_pgsql” 拓展,如果没安装拓展则点击安装完成的PHP后面的“扩展”按钮进行安装,安装完成后记得重启一下PHP服务使其生效
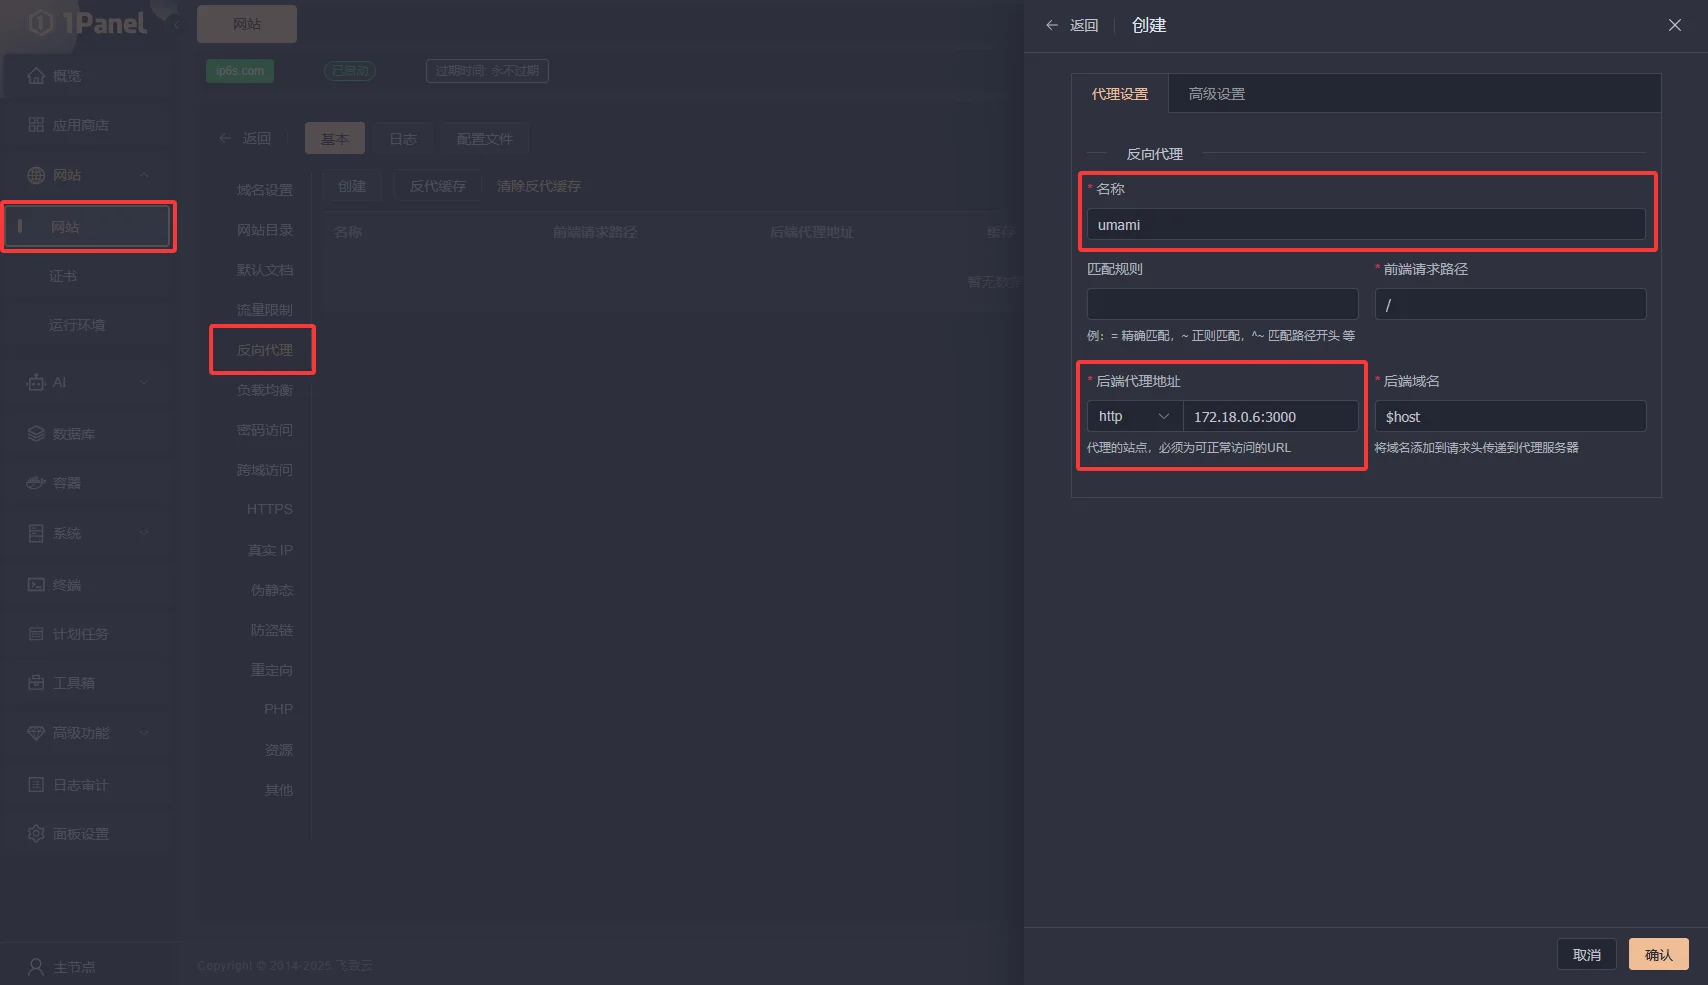
创建完成后,点击域名加入网站配置界面,添加反向代理
 注意:
注意:
后端代理地址填写umami容器的IP地址加上默认端口号3000,示例:“IP地址:3000”,名称自定义填写任意名称。
添加完成后,点击“确认”
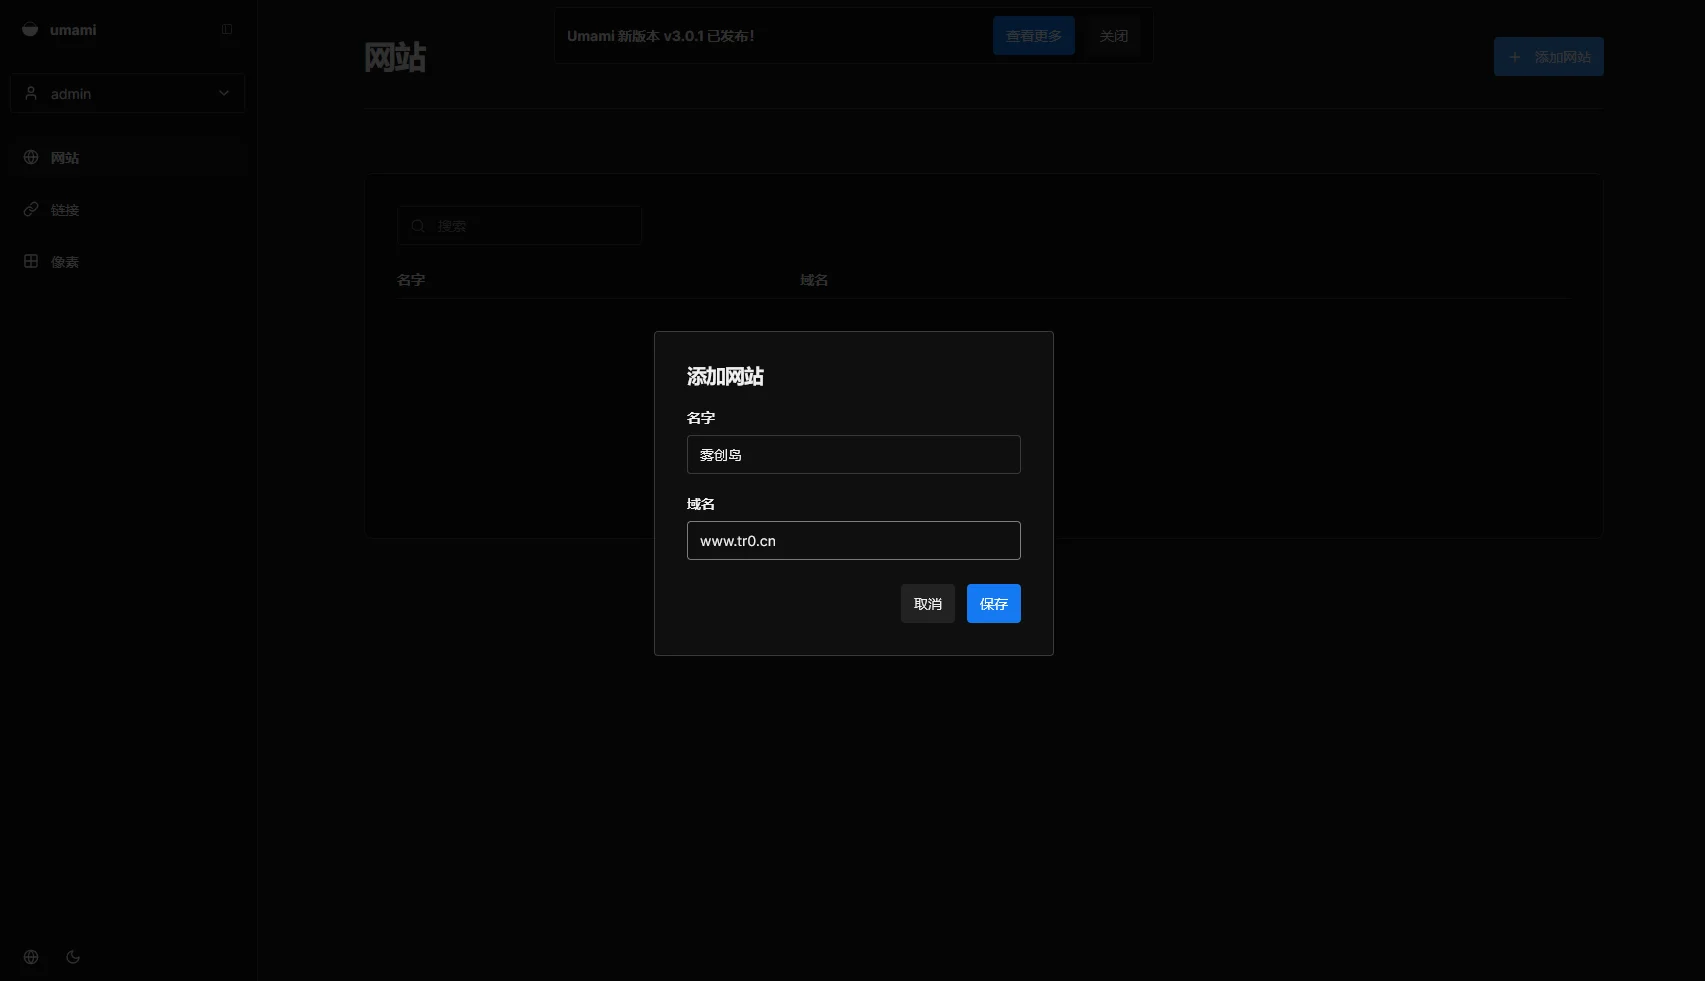
- 登录umami添加网站
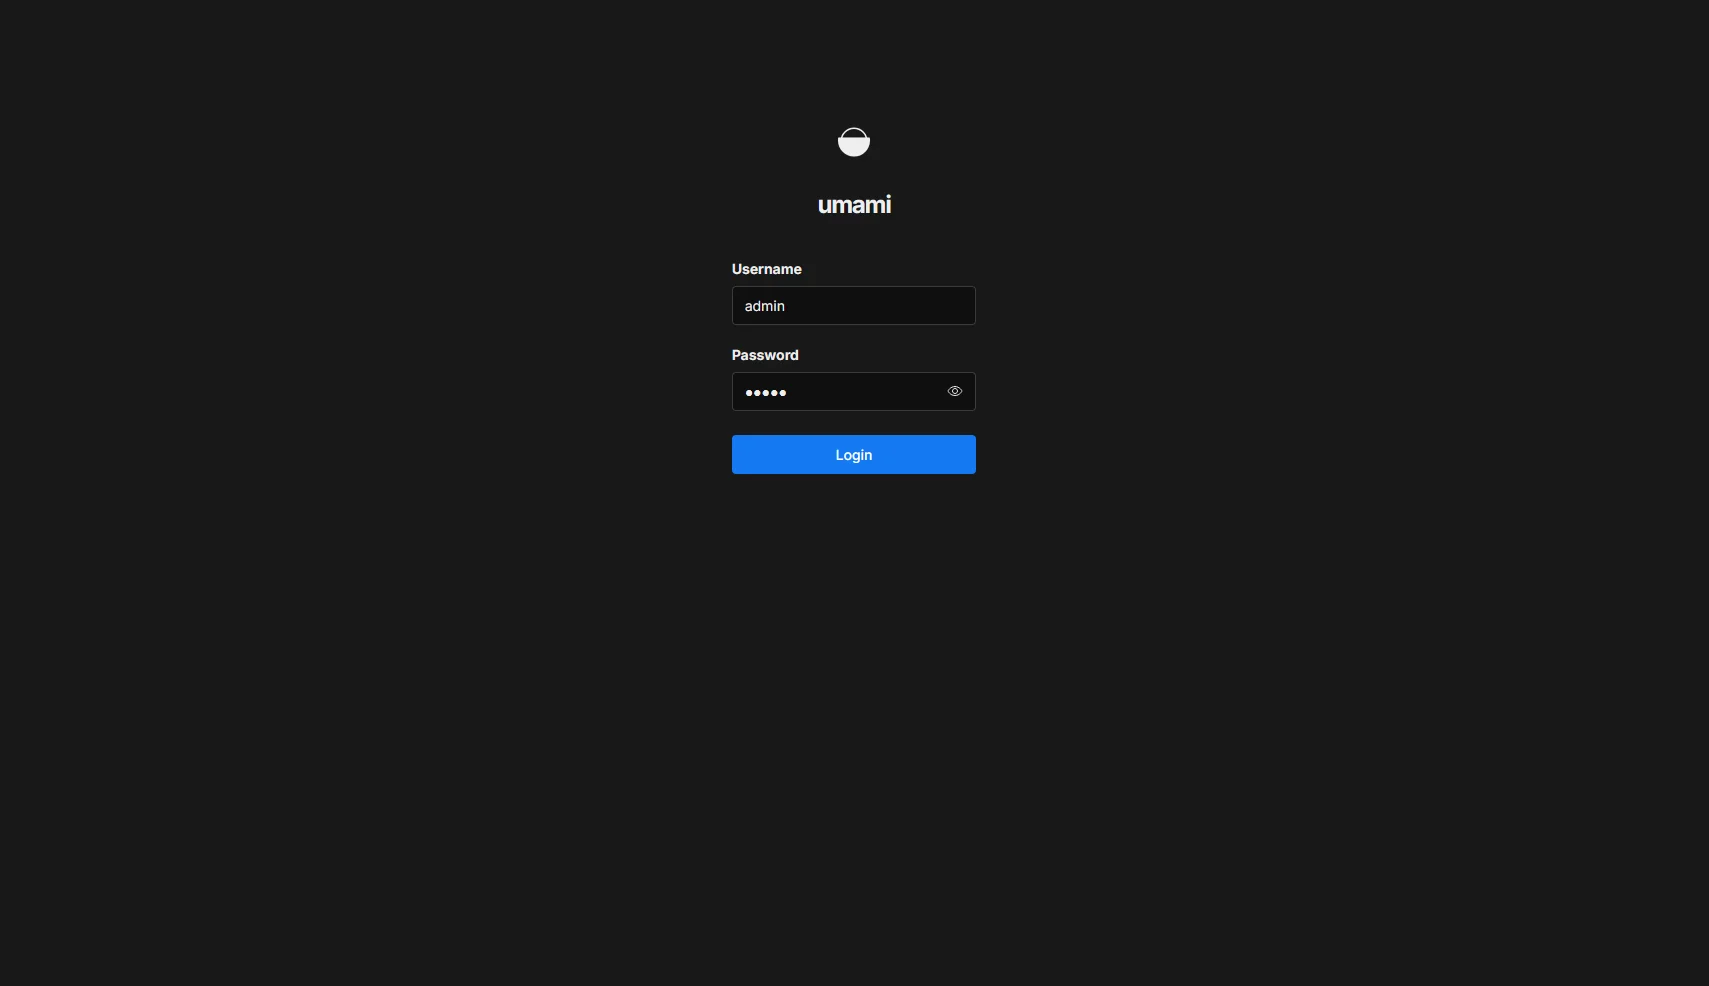
访问umami的登录页面(你的站点域名),使用默认用户名密码登录,默认用户名密码为:admin umami
注意: 可以将umami默认语言切换成中文,这样umami的界面就会变成中文方便后续配置。
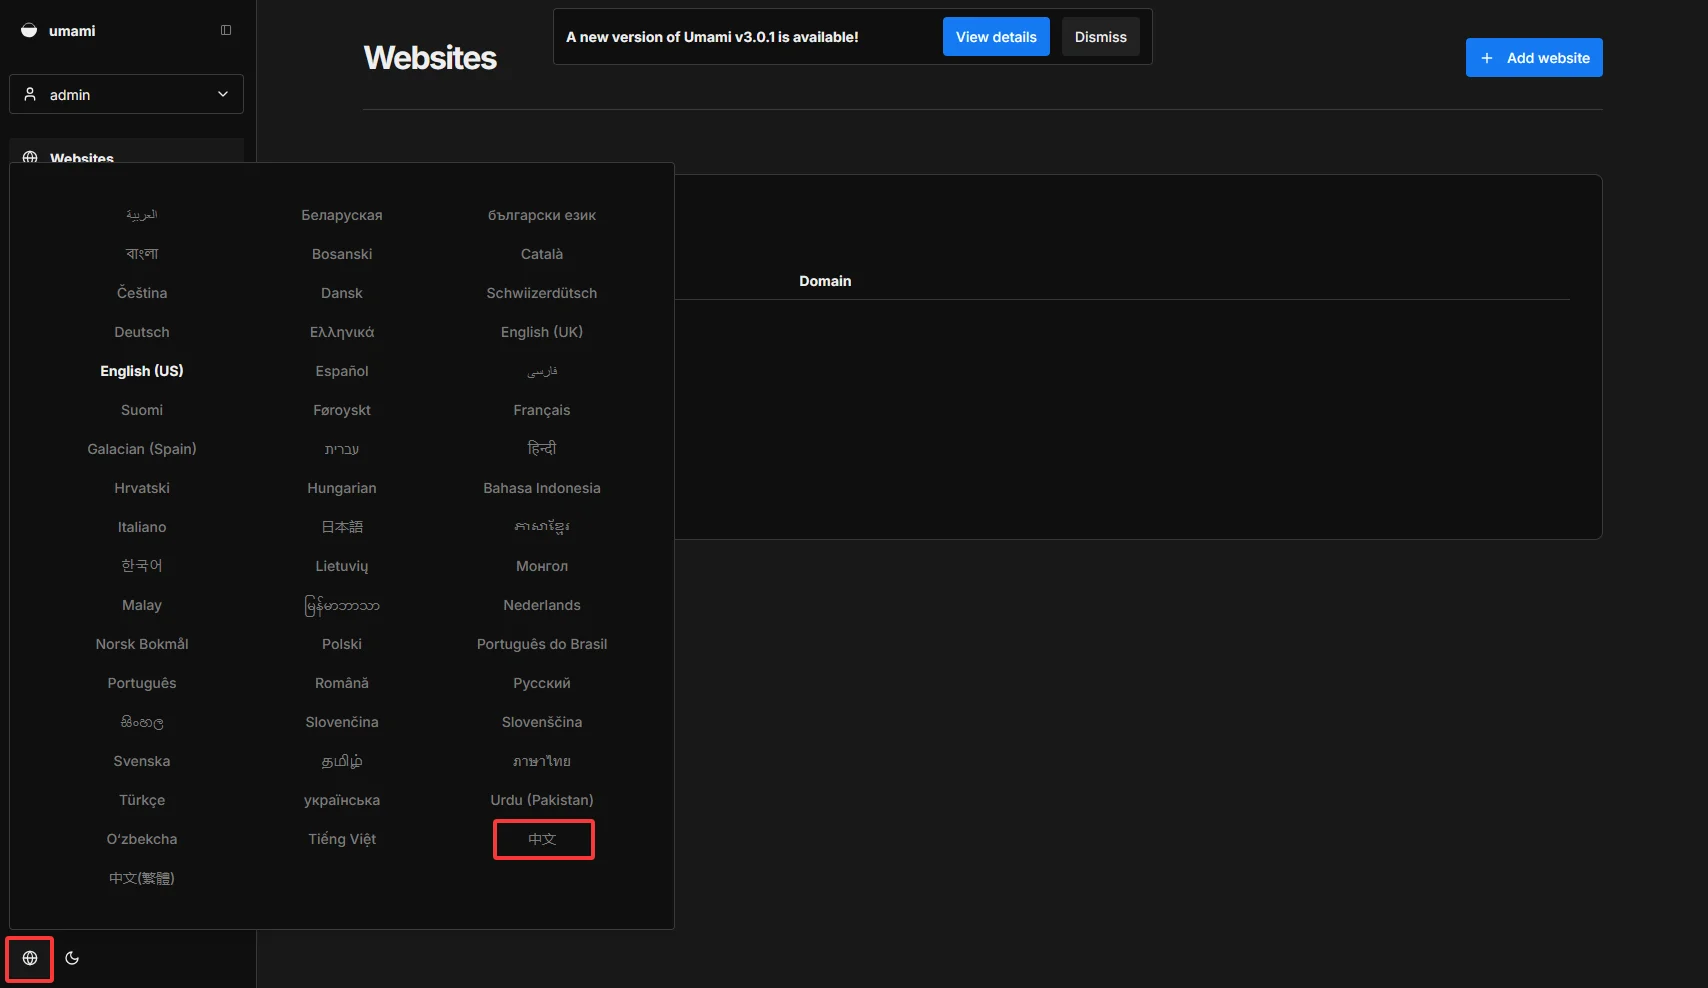
登录成功后,点击添加网站,名字随意,域名填写你的Astro Fuwari 博客域名。
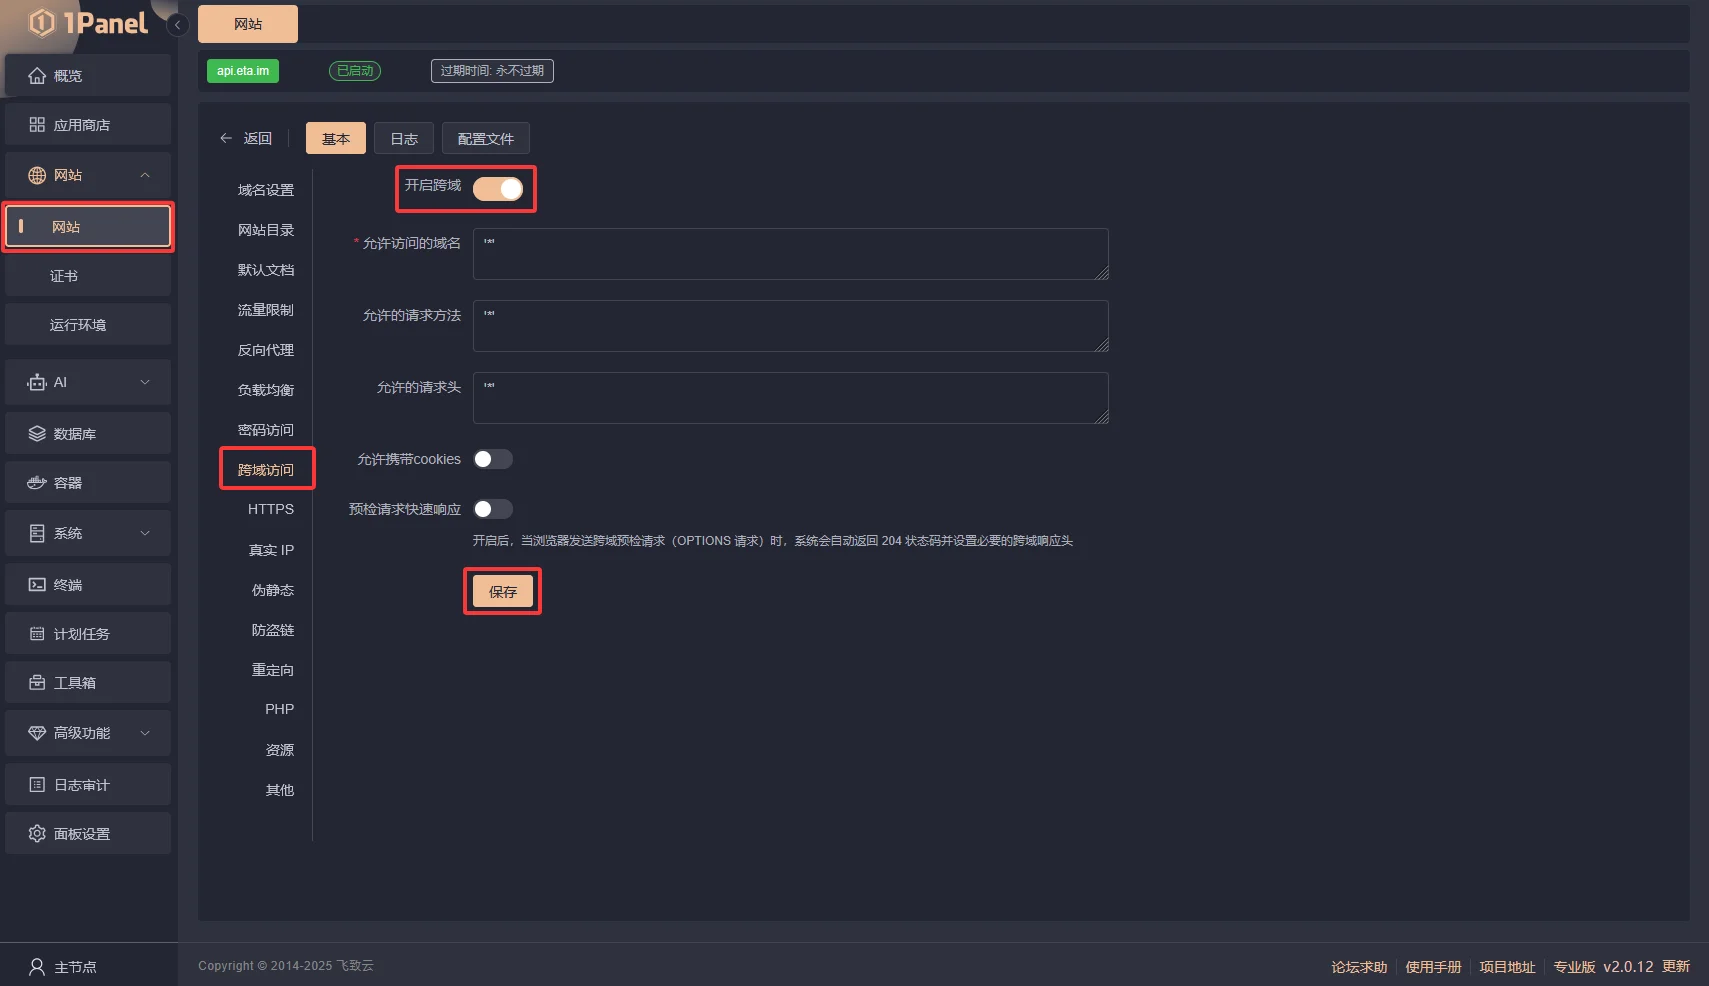
- 配置umami跨域访问
返回1panel面板,点击“网站”-“umami站点”-“跨域访问”-“开启跨域”-“保存”
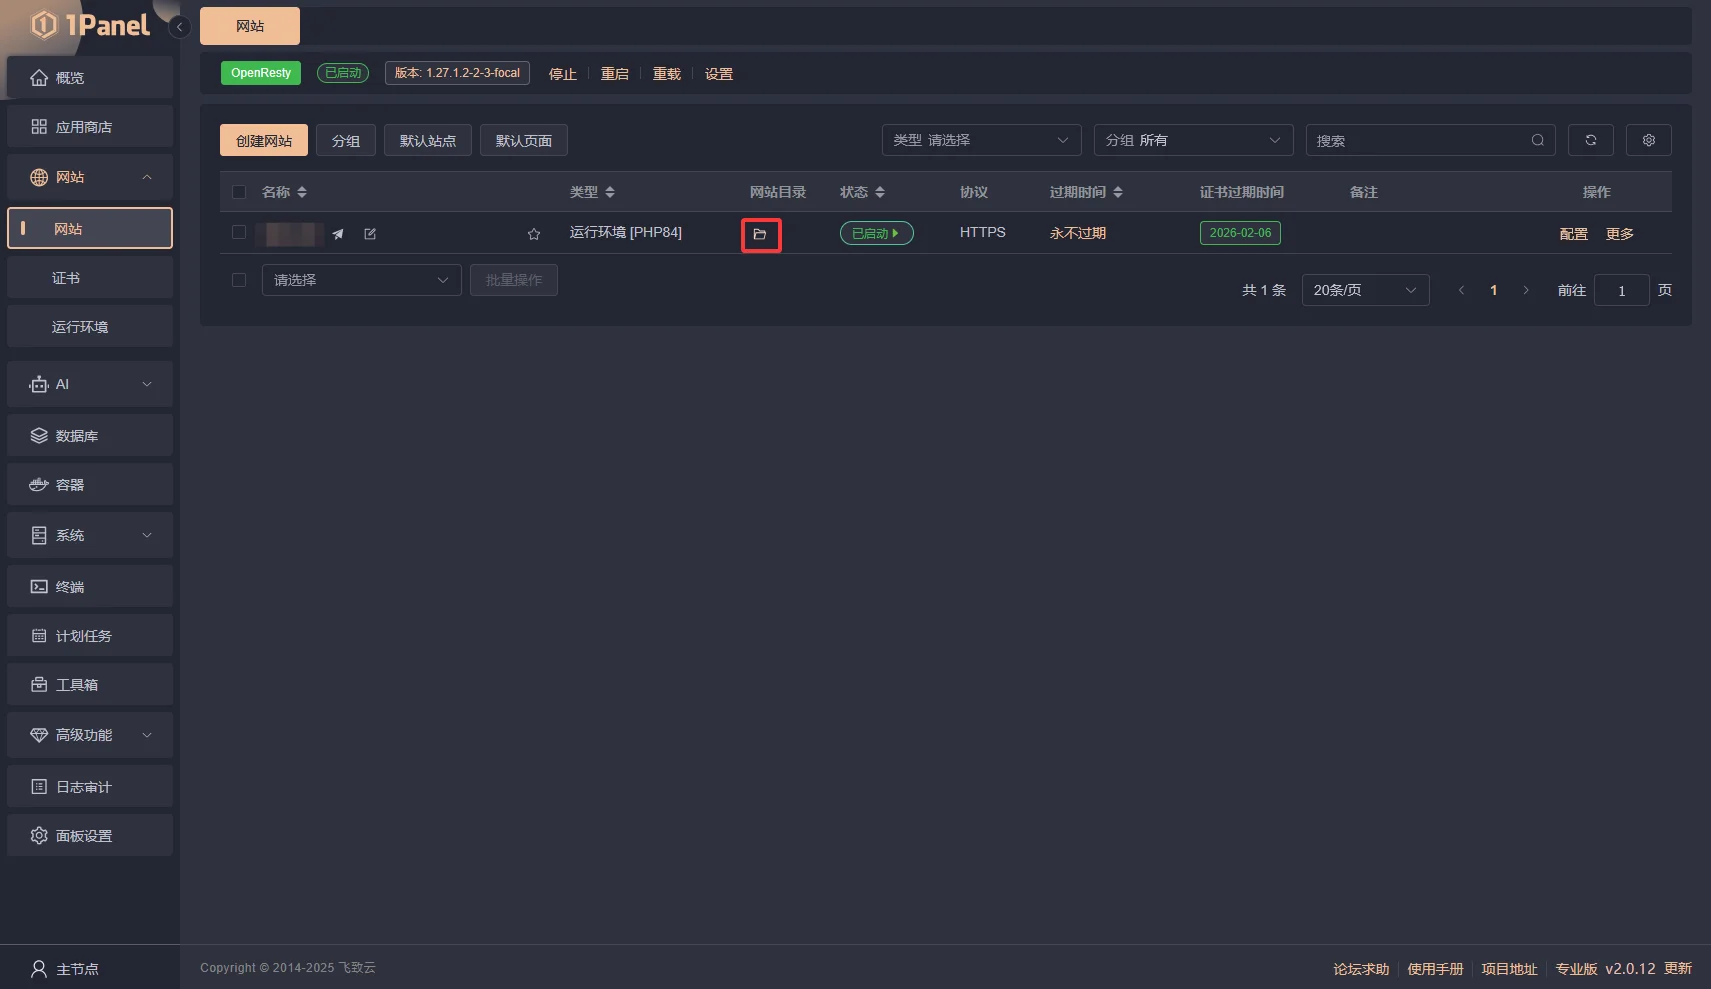
- 添加API接口
返回1panel面板,点击“网站”-“umami站点”-“网站目录”,点击“文件夹”图标,进入网站根目录
创建一个名为api.php文件,将下方的代码复制到文件中。
注意
数据库名称、用户名、密码 在1panel面板数据库-PostgreSQL中查看。
<?php$dbConfig = [ 'host' => '1Panel-postgresql-uOFp', // 替换为你的数据库主机,可以直接填写PostgreSQL容器名称 'dbname' => 'umami_5rdc8p', // 替换为你的数据库名称 'user' => 'umami_YsSEn2', // 替换为你的数据库用户名 'password' => 'umami_HCEhzC' // 替换为你的数据库密码];$domain = 'www.tr0.cn'; // 替换为你的Astro Fuwari博客域名,和umami添加的网站配置的域名一致// 设置JSON响应头header('Content-Type: application/json; charset=utf-8');
try { // 1. 处理POST请求数据 $postData = json_decode(file_get_contents('php://input'), true);
// 验证POST数据 if (!$postData || !isset($postData['article_ids']) || !is_array($postData['article_ids'])) { throw new Exception('无效的请求数据,请提供包含article_ids数组的JSON'); }
// 提取并验证文章ID(必须为整数) $targetArticleIds = array_filter(array_map(function($id) { return $id ? (string)$id : null; }, $postData['article_ids']));
if (empty($targetArticleIds)) { throw new Exception('未提供有效的文章ID列表'); }
// 2. 建立数据库连接 $pdo = new PDO( "pgsql:host={$dbConfig['host']};dbname={$dbConfig['dbname']}", $dbConfig['user'], $dbConfig['password'], [ PDO::ATTR_ERRMODE => PDO::ERRMODE_EXCEPTION, PDO::ATTR_DEFAULT_FETCH_MODE => PDO::FETCH_ASSOC ] );
// 3. 生成路径与ID的映射关系 $pathToIdMap = []; $queryPaths = [];
foreach ($targetArticleIds as $id) { $cleanId = (string)$id; $path1 = "/{$cleanId}"; // 原版路径修改为 /posts/{$cleanId} $path2 = "/{$cleanId}/"; // 原版路径修改为 /posts/{$cleanId}/
$pathToIdMap[$path1] = $cleanId; $pathToIdMap[$path2] = $cleanId; $queryPaths[] = $path1; $queryPaths[] = $path2; }
// 4. 生成SQL查询 $placeholders = implode(', ', array_fill(0, count($queryPaths), '?'));
$sql = "WITH ordered_events AS ( SELECT url_path, hostname, session_id, created_at, ROW_NUMBER() OVER ( PARTITION BY session_id, url_path ORDER BY created_at ) AS rn FROM website_event WHERE url_path IN ({$placeholders}) AND hostname = '{$domain}' ), filtered_events AS ( SELECT e1.url_path, e1.hostname, e1.session_id, e1.created_at FROM ordered_events e1 LEFT JOIN ordered_events e2 ON e1.session_id = e2.session_id AND e1.url_path = e2.url_path AND e2.rn = e1.rn - 1 AND e1.created_at <= e2.created_at + INTERVAL '3 seconds' WHERE e2.rn IS NULL ) SELECT url_path, COUNT(*) AS visit_count, hostname FROM filtered_events GROUP BY url_path, hostname ORDER BY visit_count DESC";
$stmt = $pdo->prepare($sql); $stmt->execute($queryPaths); $rawResults = $stmt->fetchAll();
// 5. 统计汇总数据 $articleSummary = []; $detailedResults = [];
foreach ($rawResults as $item) { $path = $item['url_path']; $articleId = $pathToIdMap[$path]; $visits = $item['visit_count']; $hostname = $item['hostname'];
// 汇总总访问量 if (!isset($articleSummary[$articleId])) { $articleSummary[$articleId] = 0; } $articleSummary[$articleId] += $visits;
// 记录详细数据 $detailedResults[] = [ 'article_id' => $articleId, 'url_path' => $path, 'hostname' => $hostname, 'visit_count' => $visits ]; }
// 6. 构建输出JSON $output = [ 'success' => true, 'query_time' => date('Y-m-d H:i:s'), 'target_article_ids' => array_values($targetArticleIds), 'summary' => [], 'details' => $detailedResults ];
// 整理汇总数据 foreach ($targetArticleIds as $id) { $output['summary'][] = [ 'article_id' => $id, 'total_visits' => $articleSummary[$id] ?? 0, 'matched_paths' => ["/{$id}", "/{$id}/"] // 原版路径修改为 ["/posts/{$id}", "/posts/{$id}/"] ]; }
// 输出JSON echo json_encode($output, JSON_PRETTY_PRINT | JSON_UNESCAPED_UNICODE);
} catch (Exception $e) { // 错误处理(JSON格式) echo json_encode([ 'success' => false, 'error' => $e->getMessage(), 'query_time' => date('Y-m-d H:i:s') ], JSON_PRETTY_PRINT | JSON_UNESCAPED_UNICODE);} finally { $pdo = null;}?>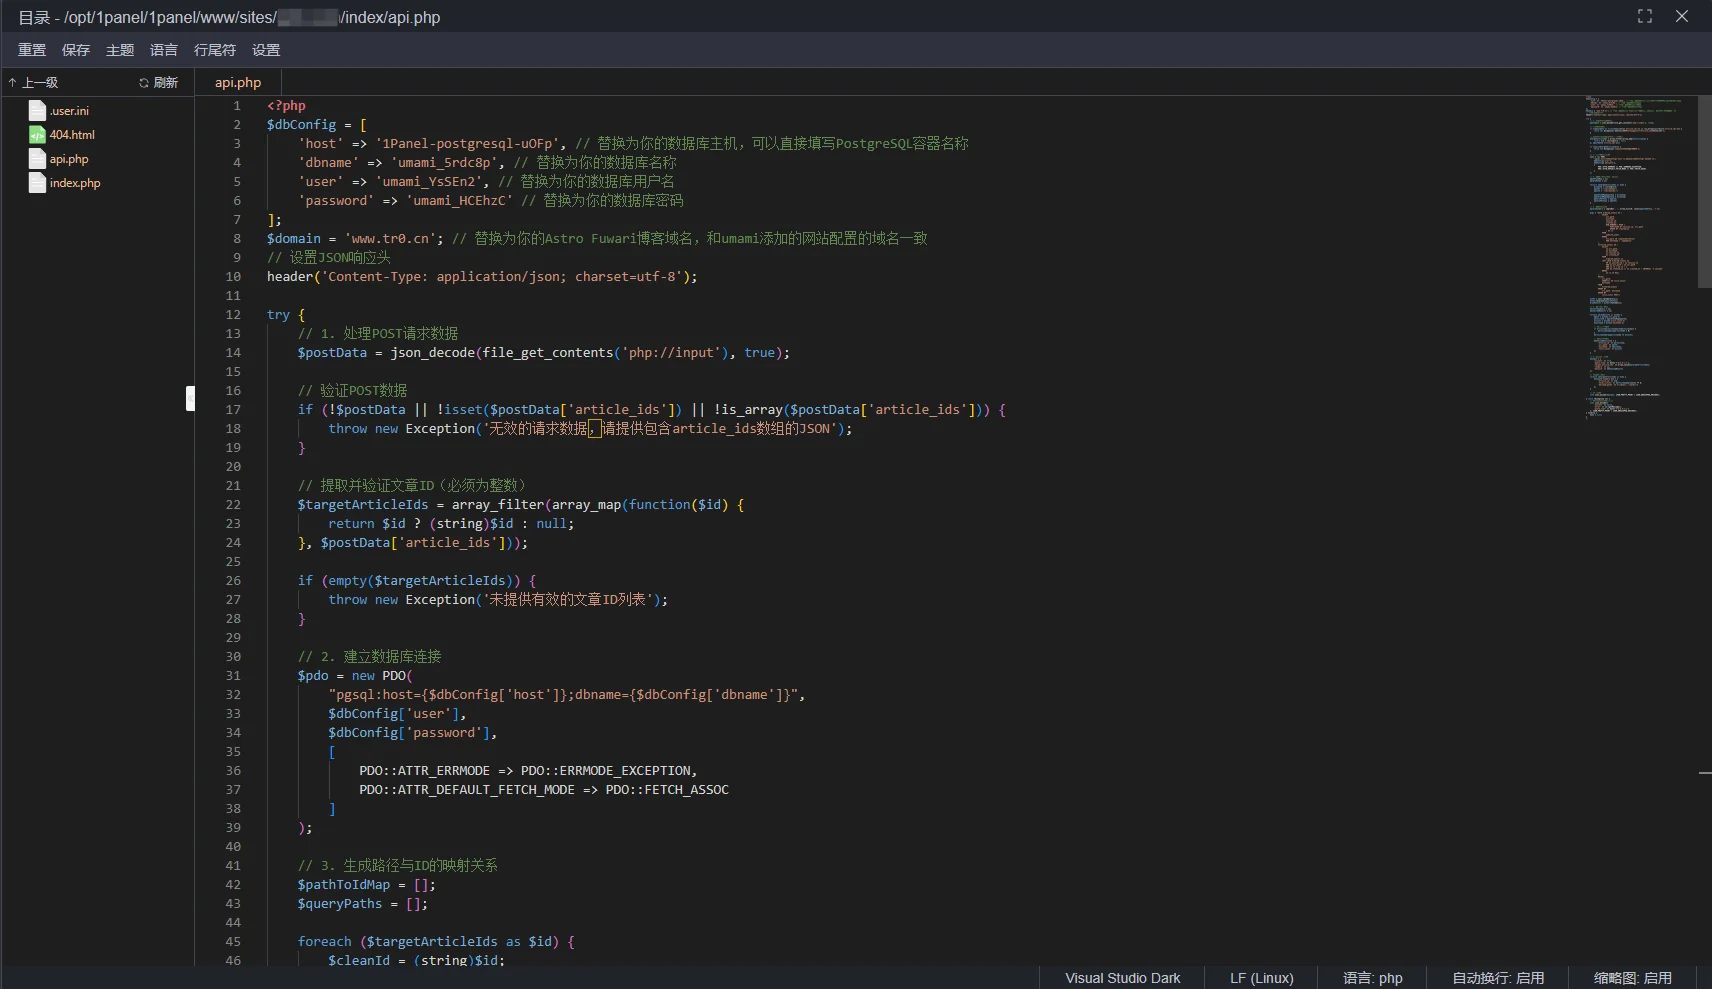
- 配置网站允许访问api.php脚本
添加如下配置到你的Nginx配置文件中,将/summary路径指向api.php脚本。
在1panel打开umami站点配置-配置文件-添加如下配置。
location /summary { if ($request_uri = /summary) { rewrite ^ /api.php last; }}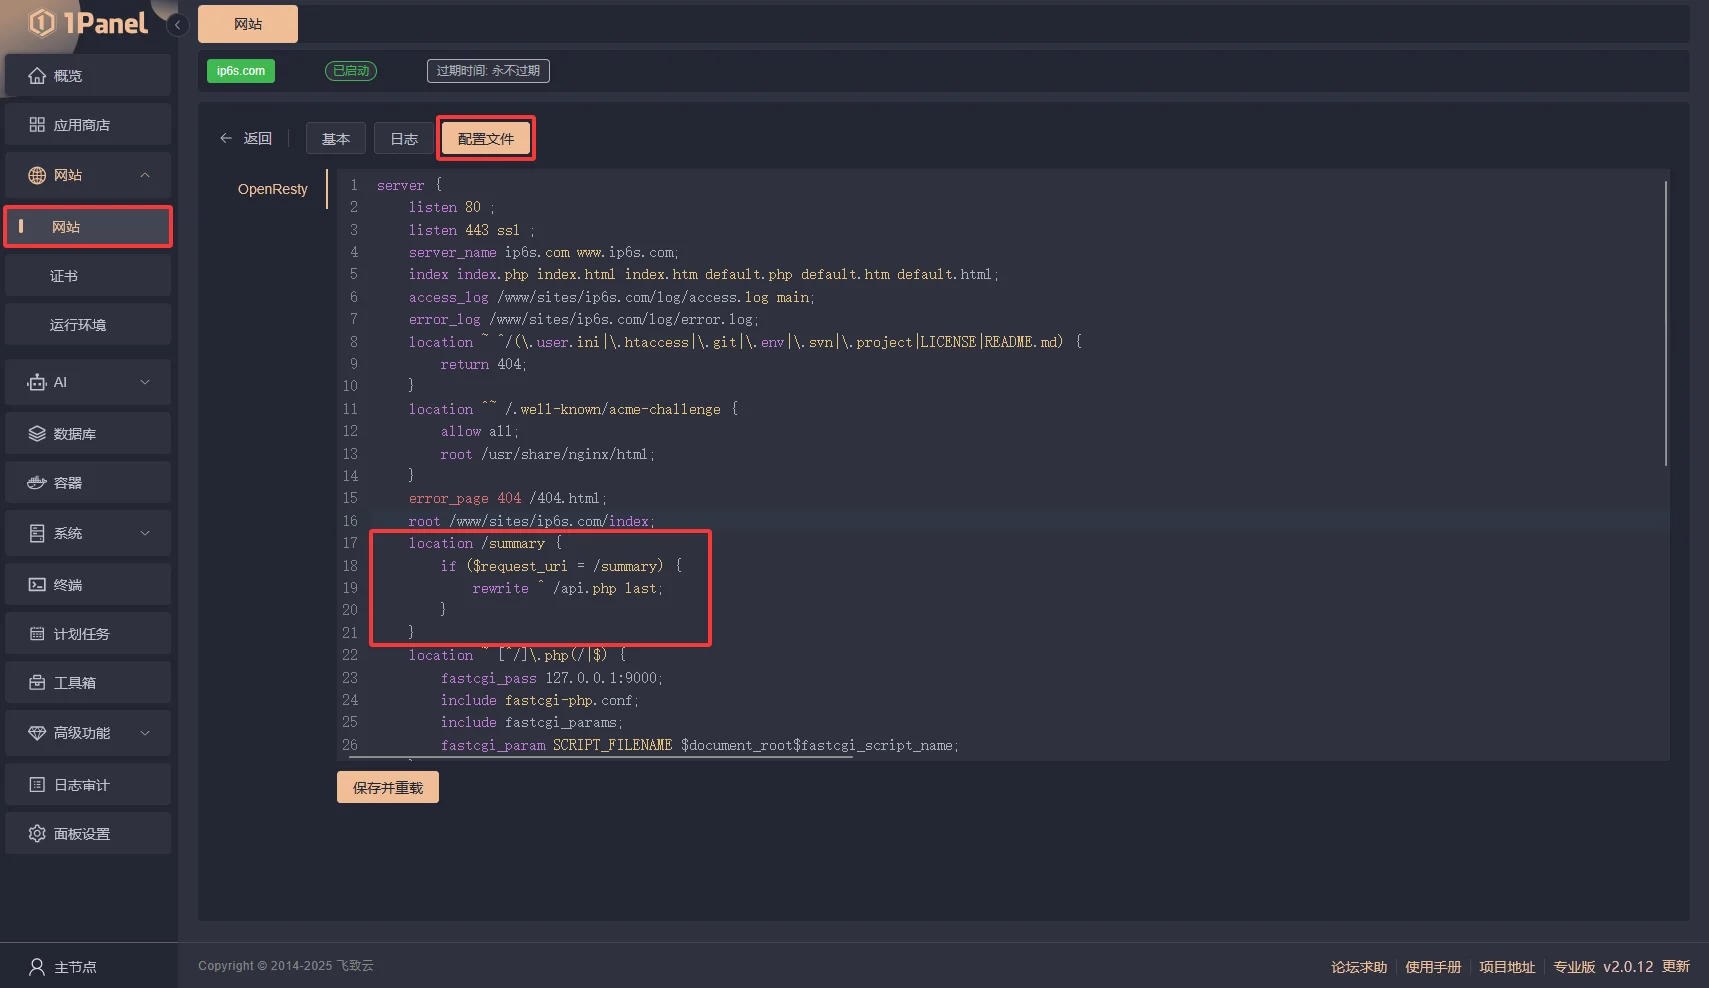
完成后点击“保存并重载”。
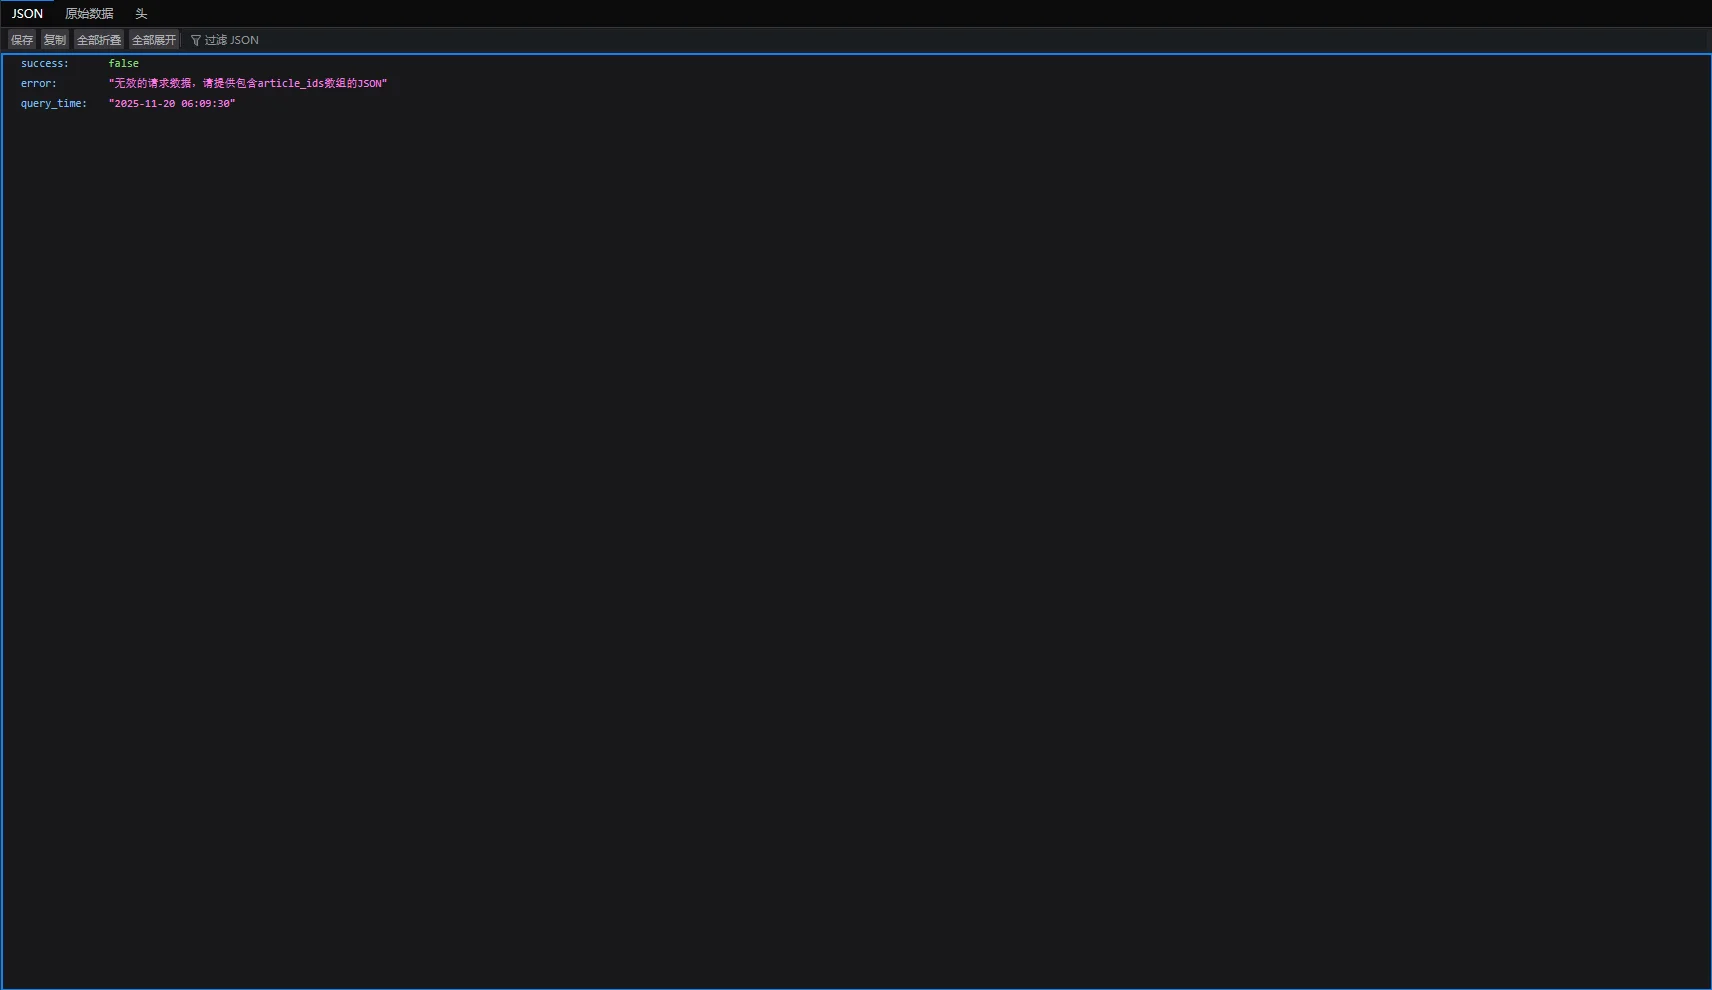
打开http://你的umami域名/summary查看是否正常访问,如果没问题则umami配置完成。
- Astro Fuwari 博客对接umami 统计
打开umami站点,找到创建的站点进去,然后点击右上角的“Edit”,找到“跟踪代码”复制下来。
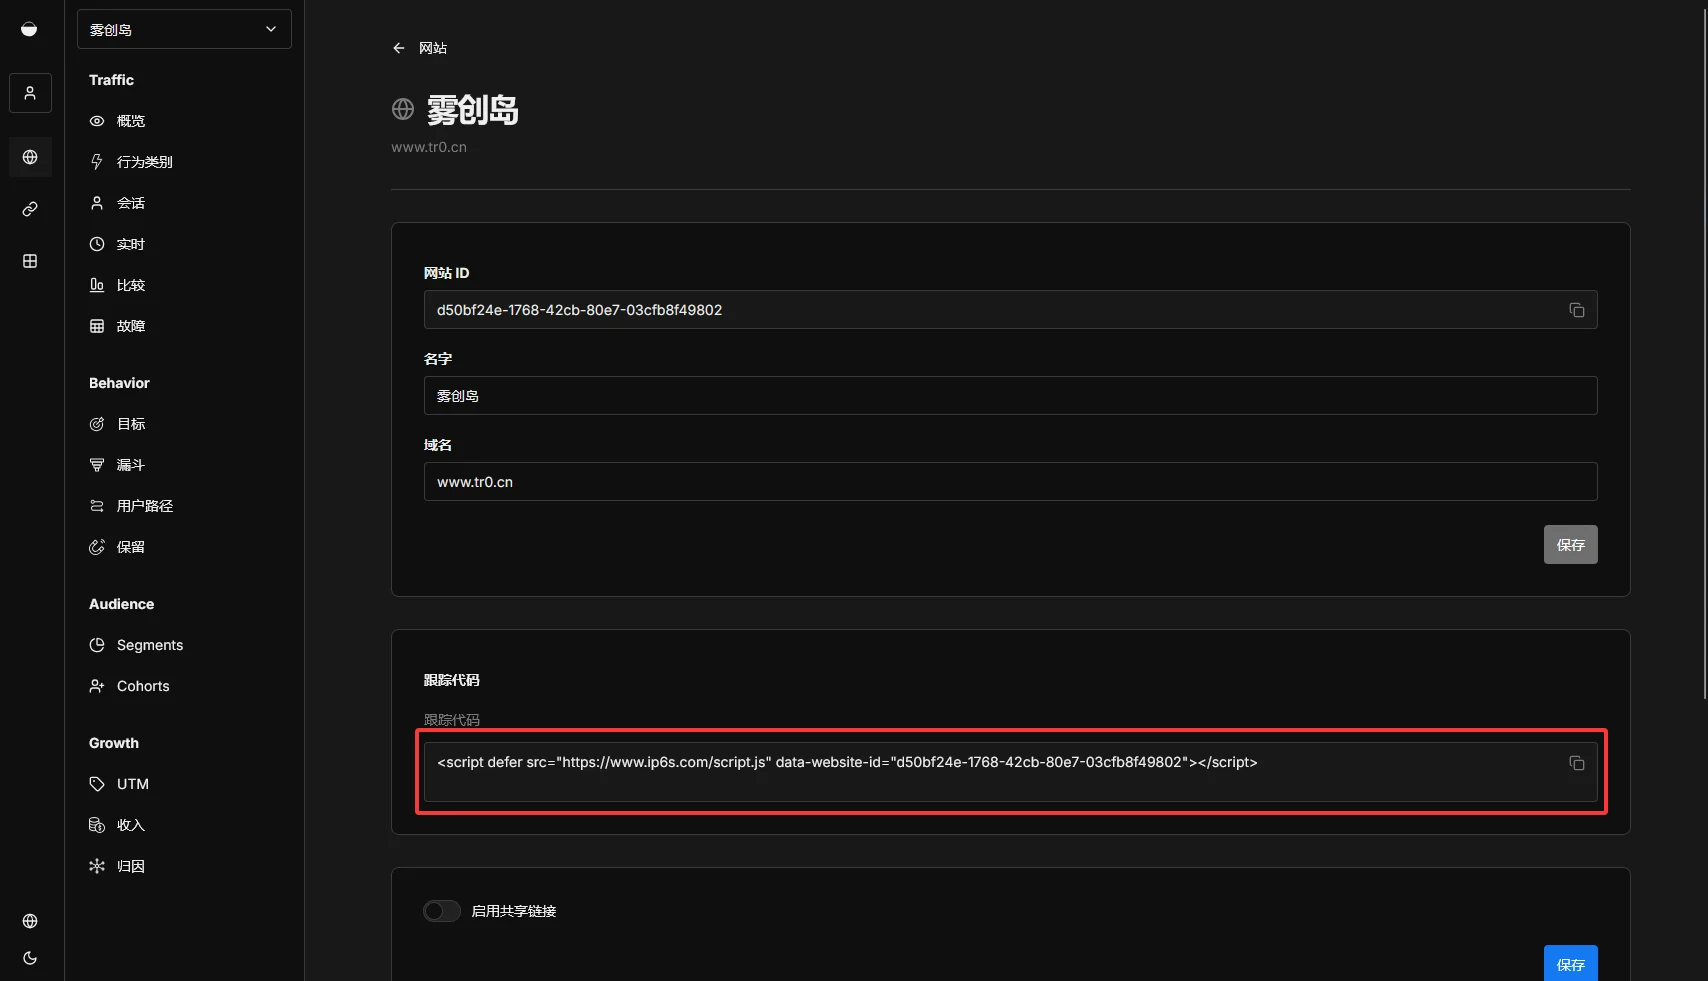
将获取的代码插入到Astro Fuwari博客的src/layouts/Layout.astro文件中,<head>头部标签内。

然后将下方代码添加到对应的文件内:
src/components/PostMeta.astro
interface Props { class?: string; published: Date; updated?: Date; tags: string[]; category: string[]; hideTagsForMobile?: boolean; hideUpdateDate?: boolean;+ articleId?: string | null;}const { published, updated, tags, category, hideTagsForMobile = false, hideUpdateDate = false,+ articleId,} = Astro.props;
<div class:list={["flex flex-wrap text-neutral-500 dark:text-neutral-400 items-center gap-4 gap-x-4 gap-y-2", className]}>+ <!-- 访问量显示 -->+ {articleId && (+ <div class="flex items-center gap-1">+ <Icon name="material-symbols:visibility-outline" class="w-4 h-4 text-neutral-500 dark:text-neutral-400" />+ <span id={`visit-count-${articleId}`} class="visit-count text-50 text-sm font-medium" data-article-id={articleId}>+ <span class="loading-text">加载中...</span>+ </span>+ </div>+ )}
<!-- publish date --> <div class="flex items-center"> <span class="text-50 text-sm font-medium">{formatDateToYYYYMMDD(published)}</span> </div>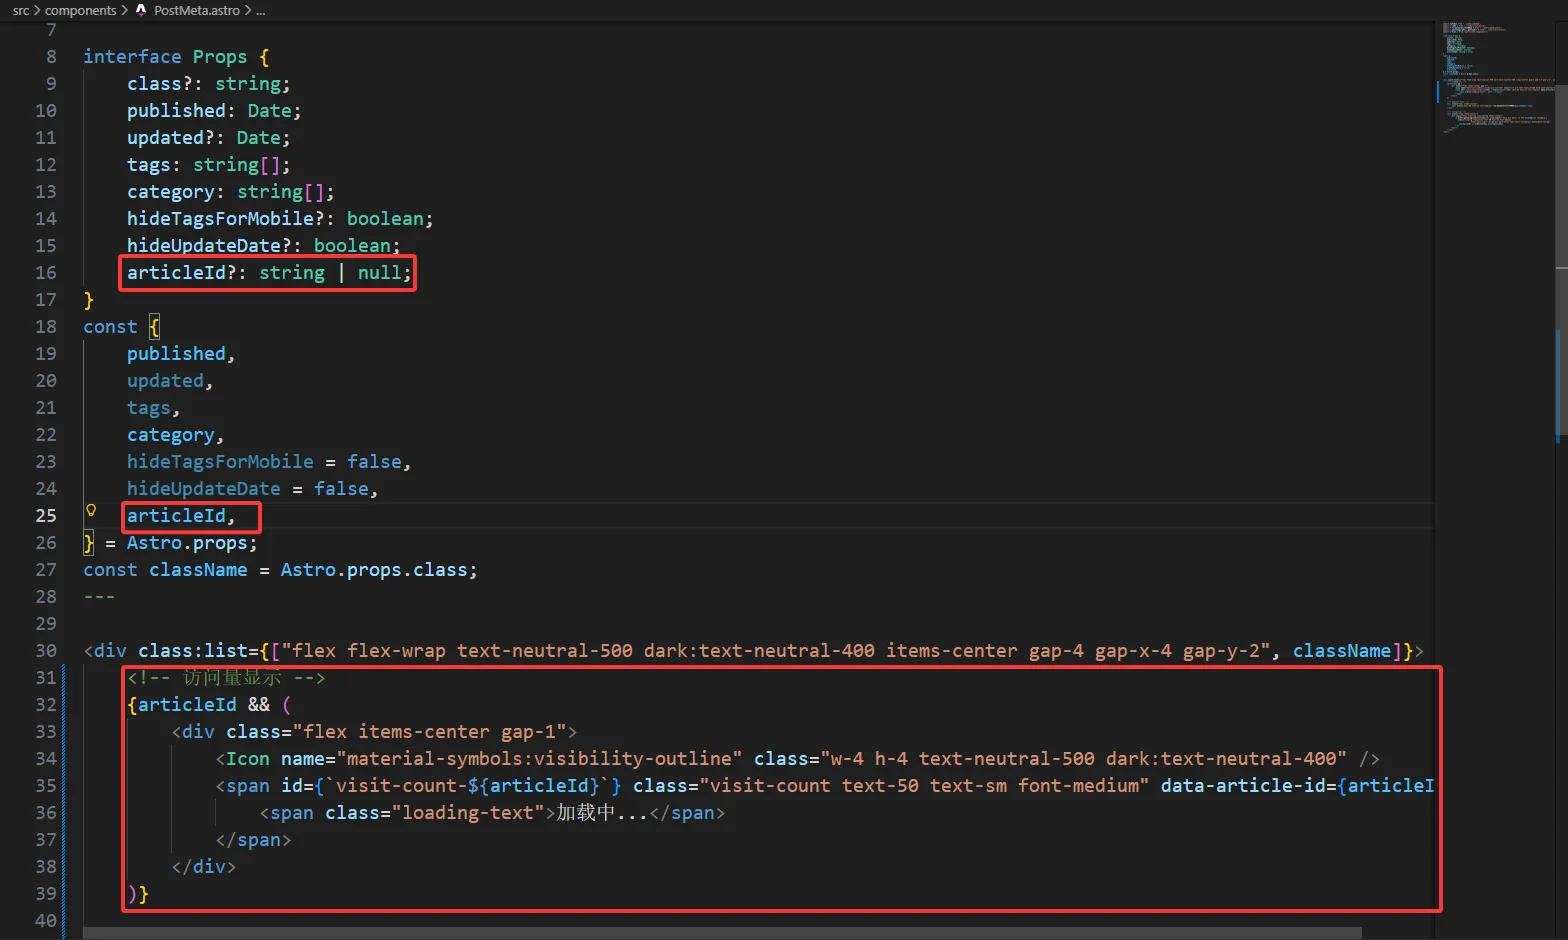
src/components/PostCard.astro
const { remarkPluginFrontmatter } = await entry.render();
// 从URL路径中提取文章IDconst extractArticleId = (urlPath: string) => { const match = urlPath.match(/\/(.*)?\/$/); // 原版路径修改为 urlPath.match(/\/posts\/(.*?)\/$/) return match ? match[1] : null;};
const articleId = extractArticleId(url);
<script> // 访问量API调用函数 async function fetchVisitCounts(articleIds: any[]) { try { const response = await fetch('http://你的umami域名/summary', { method: 'POST', headers: { 'Content-Type': 'application/json', }, body: JSON.stringify({ article_ids: articleIds }) });
const data = await response.json();
if (data.success) { return data.summary; } else { console.error('API错误:', data.error); return []; } } catch (error) { console.error('获取访问量失败:', error); return []; } }
function updateVisitCounts(visitData: any[]) { visitData.forEach((item: any) => { const element = document.getElementById(`visit-count-${item.article_id}`); if (element) { element.innerHTML = `${item.total_visits}`; element.classList.add('loaded'); } }); }
function handleLoadError(articleIds: any[]) { articleIds.forEach((id: string) => { const element = document.getElementById(`visit-count-${id}`); if (element) { element.innerHTML = '0'; element.classList.add('error'); } }); }
async function loadVisitCounts() { const visitCountElements = document.querySelectorAll('.visit-count[data-article-id]'); const articleIds = Array.from(visitCountElements).map(el => { const idStr = el.getAttribute('data-article-id'); return idStr ? idStr : null; }).filter(id => id);
if (articleIds.length > 0) { articleIds.forEach(id => { const element = document.getElementById(`visit-count-${id}`); if (element) { element.innerHTML = '<span class="loading-text">加载中...</span>'; element.classList.remove('loaded', 'error'); } });
const visitData = await fetchVisitCounts(articleIds);
if (visitData.length > 0) { updateVisitCounts(visitData); } else { handleLoadError(articleIds); } } } document.addEventListener('DOMContentLoaded', loadVisitCounts);
let currentUrl = window.location.href; const checkUrlChange = () => { if (window.location.href !== currentUrl) { currentUrl = window.location.href; setTimeout(loadVisitCounts, 200); } };
setInterval(checkUrlChange, 500);
window.addEventListener('popstate', function() { setTimeout(loadVisitCounts, 100); });</script>
<style>.visit-count .loading-text { opacity: 0.6; animation: pulse 1.5s ease-in-out infinite;}
.visit-count.loaded { opacity: 1;}
.visit-count.error { opacity: 0.5;}
@keyframes pulse { 0%, 100% { opacity: 0.6; } 50% { opacity: 0.3; }}</style>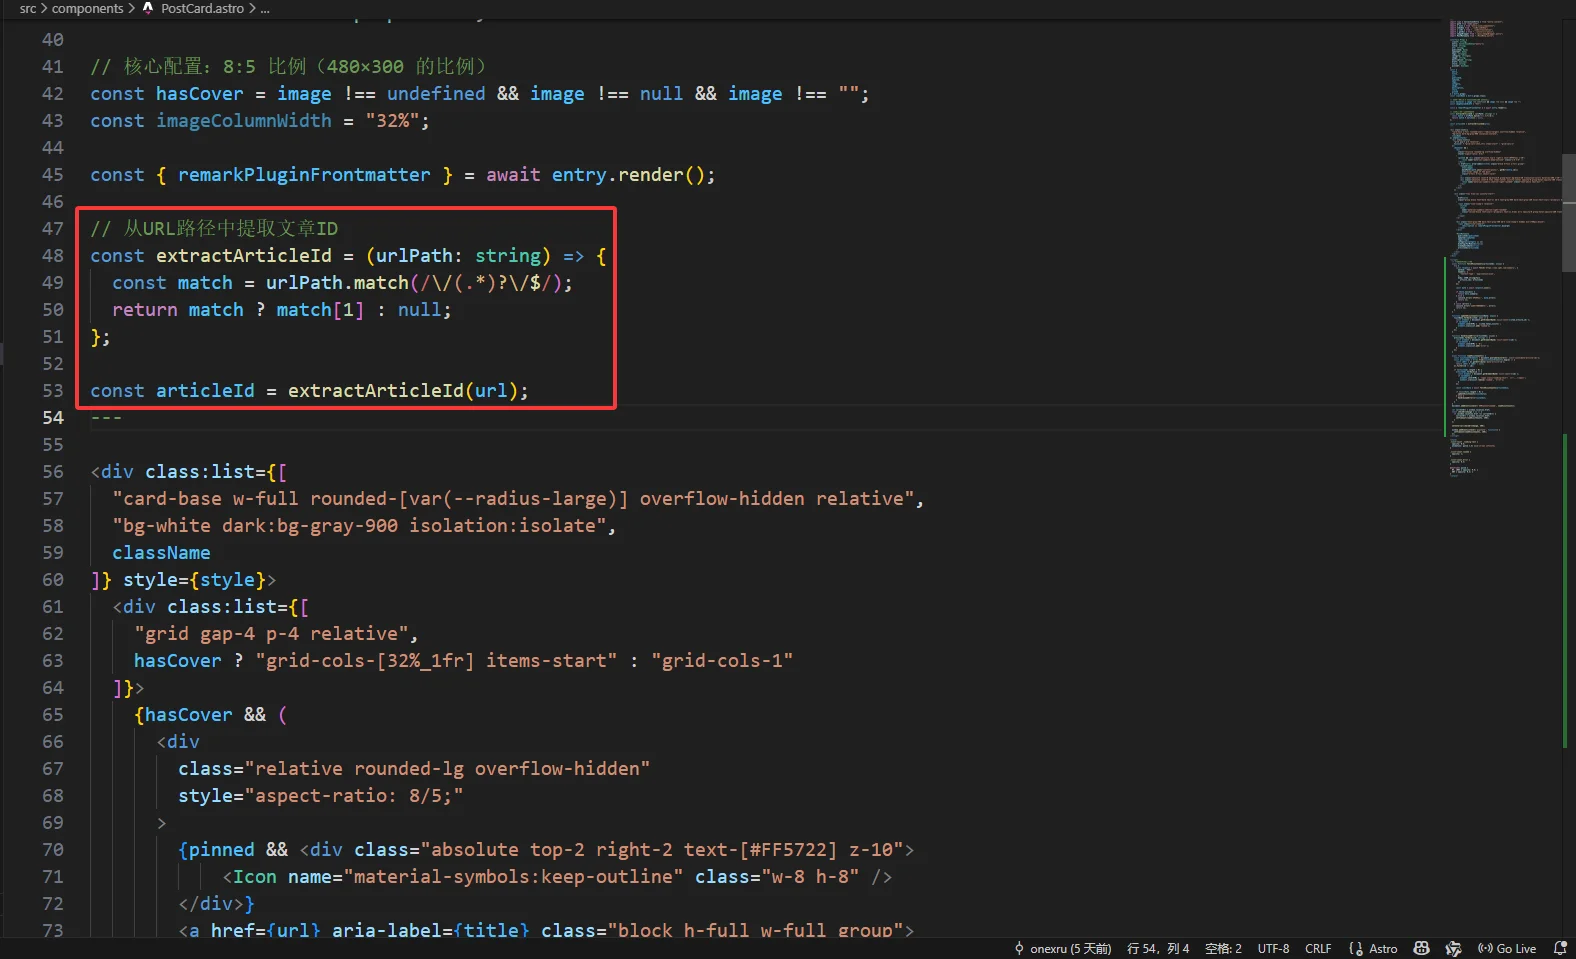
注意:
<script>部分放在文件最下方,修改const response = await fetch('http://你的umami域名/summary', API接口配置为你的umami API接口。
- 完成,运行查看效果
运行pnpm run start启动博客,访问http://localhost:4321查看效果。
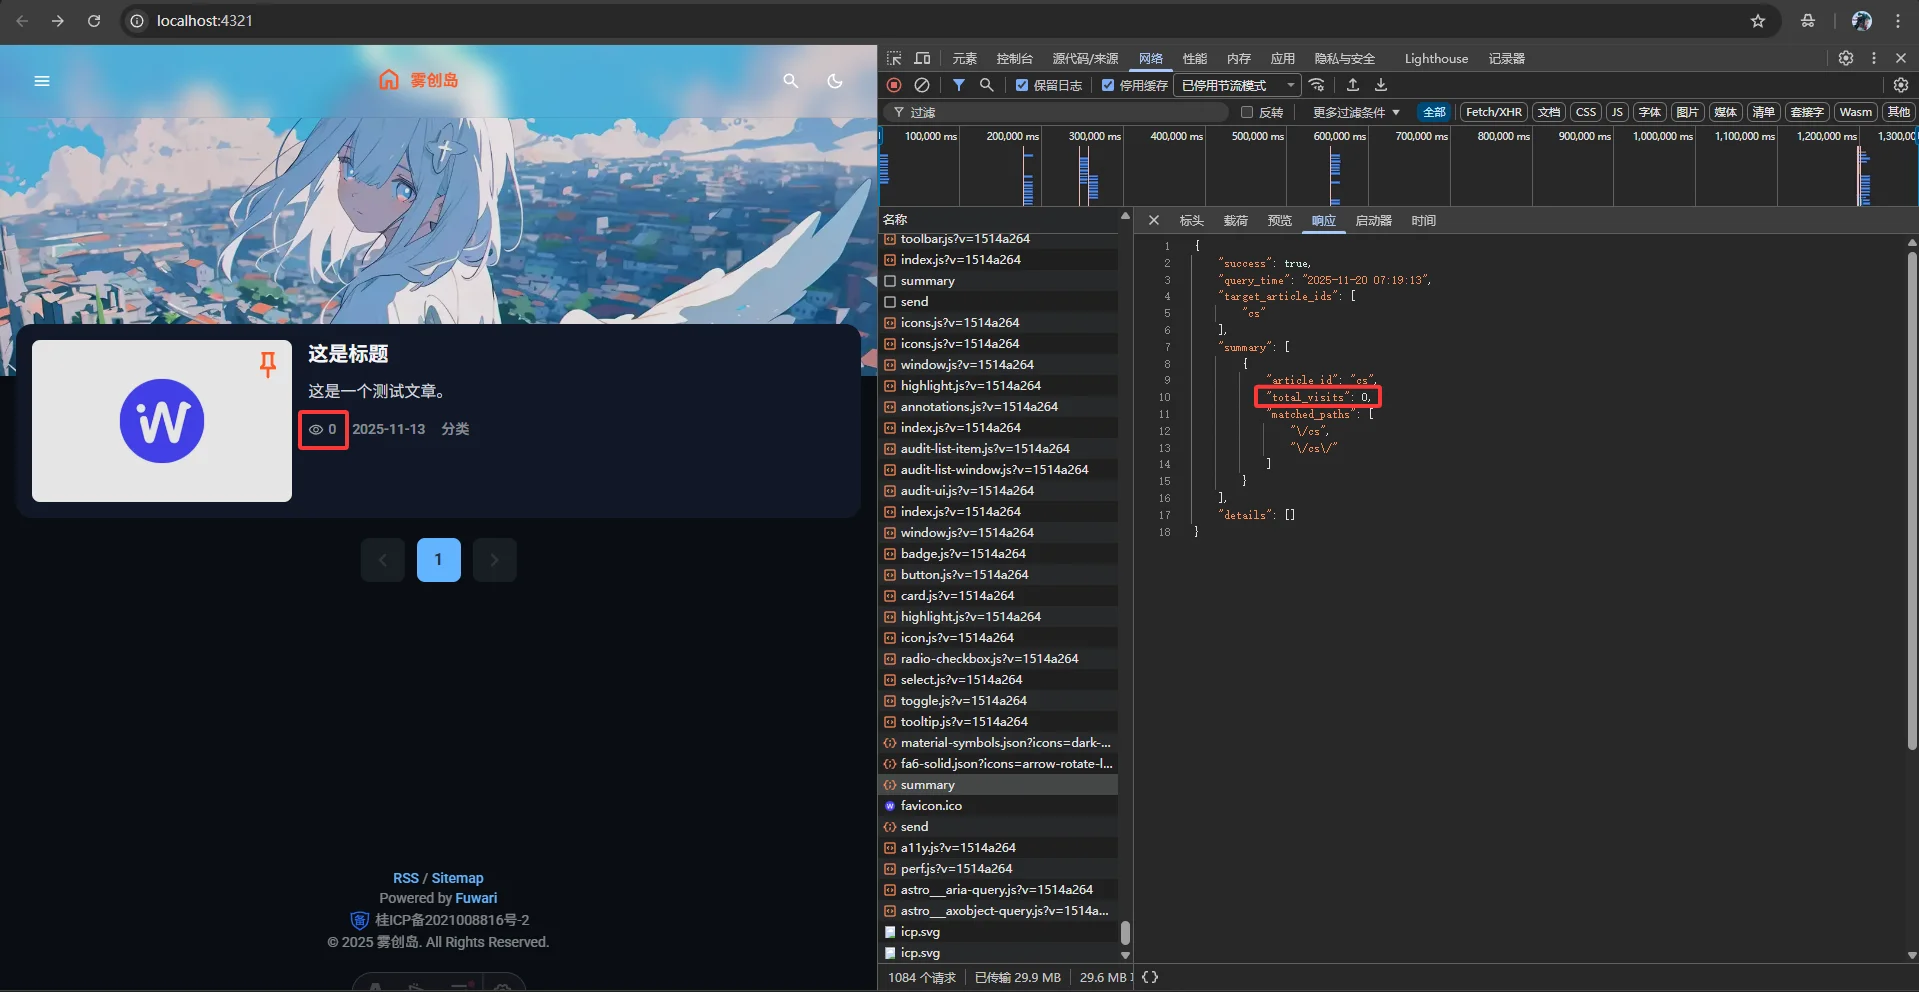
大功告成!
注意
如果你使用的是原版的Astro Fuwari,那么对应文章路径应为“/posts/{id}”,你需要修改对应路径为“/posts/{id}”。
$path1 = "/{$cleanId}"; // 原版路径修改为 /posts/{$cleanId}$path2 = "/{$cleanId}/"; // 原版路径修改为 /posts/{$cleanId}/
'matched_paths' => ["/{$id}", "/{$id}/"] // 原版路径修改为 ["/posts/{$id}", "/posts/{$id}/"]const match = urlPath.match(/\/(.*)?\/$/); // 原版路径修改为 urlPath.match(/\/posts\/(.*?)\/$/)建议
此教程使用的演示Astro Fuwari博客源码是我魔改过的,不过原版的Astro Fuwari配置起来也大差不差,推荐使用我魔改过的源码。
最后如果有什么问题欢迎留言提问,我很乐意回答。
 桂ICP备2021008816号-2